Seeing as this project is asking us to incorporate forest bathing into our design proposal, I have decided to try and capture this idea and run with it. We have been told that the outdoor space that has been allocated to our pocket forest is not to include and form of outdoor swimming pool. This is to ensure the permeability of the land meaning that water and filter through. So how do you connect one to nature from within?
I initially thought that I would include large windows looking out into the forest, this would allow bath goes to have a nice view and feel some what connected to nature. However I thought that this was much to simple and obvious, and it wasn’t exactly pushing my design ability.
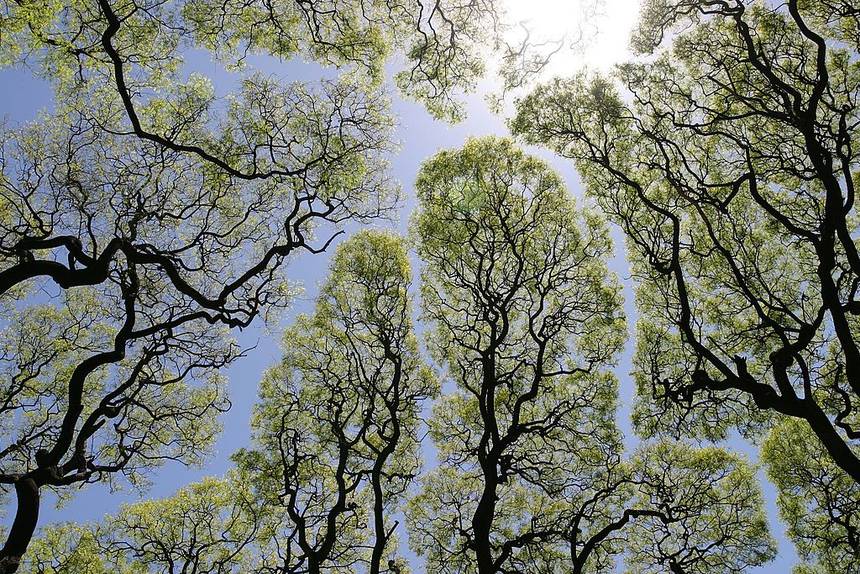
I will still incorporate windows into my design, but how do I make people feel like they swimming and bathing within and among the forest, somehow I need to capture the atmosphere and replicate it inside. I came up with a canopy, trees have canopies, when you look up they create some sort of green barrier to the sky and the elements that come with it. So why not create some sort of canopy within the basement space that replicates and emulates the feeling of being underneath trees?
A space of this nature would be very organic in form with many curves and continuous lines. It would be interesting to see if you could somehow disguise the existing pillars to fully transform the space. I plan on using rhino to further explore this idea and I will attempt to make some study models to see if ti would be feasible or not.
Lighting is a very important aspect of any design. Lighting helps to create a mood, a particular atmosphere. A space that has bad lighting is uncomfortable and sometimes interesting spaces fall victim to this problem. Light is important when it comes to making people feel a certain way, soft warm natural light is idea for relaxing situations and would be beneficial in such a calming space. Ideally natural lighting is preferred. But in difficult spaces compromises have to be made.
The bathhouse site and space will most likely to be a problematic in regards to getting light into the basement space. Not only this but also the close proximity of the surrounding buildings make it difficult for natural light to filter in.
Sun Angles
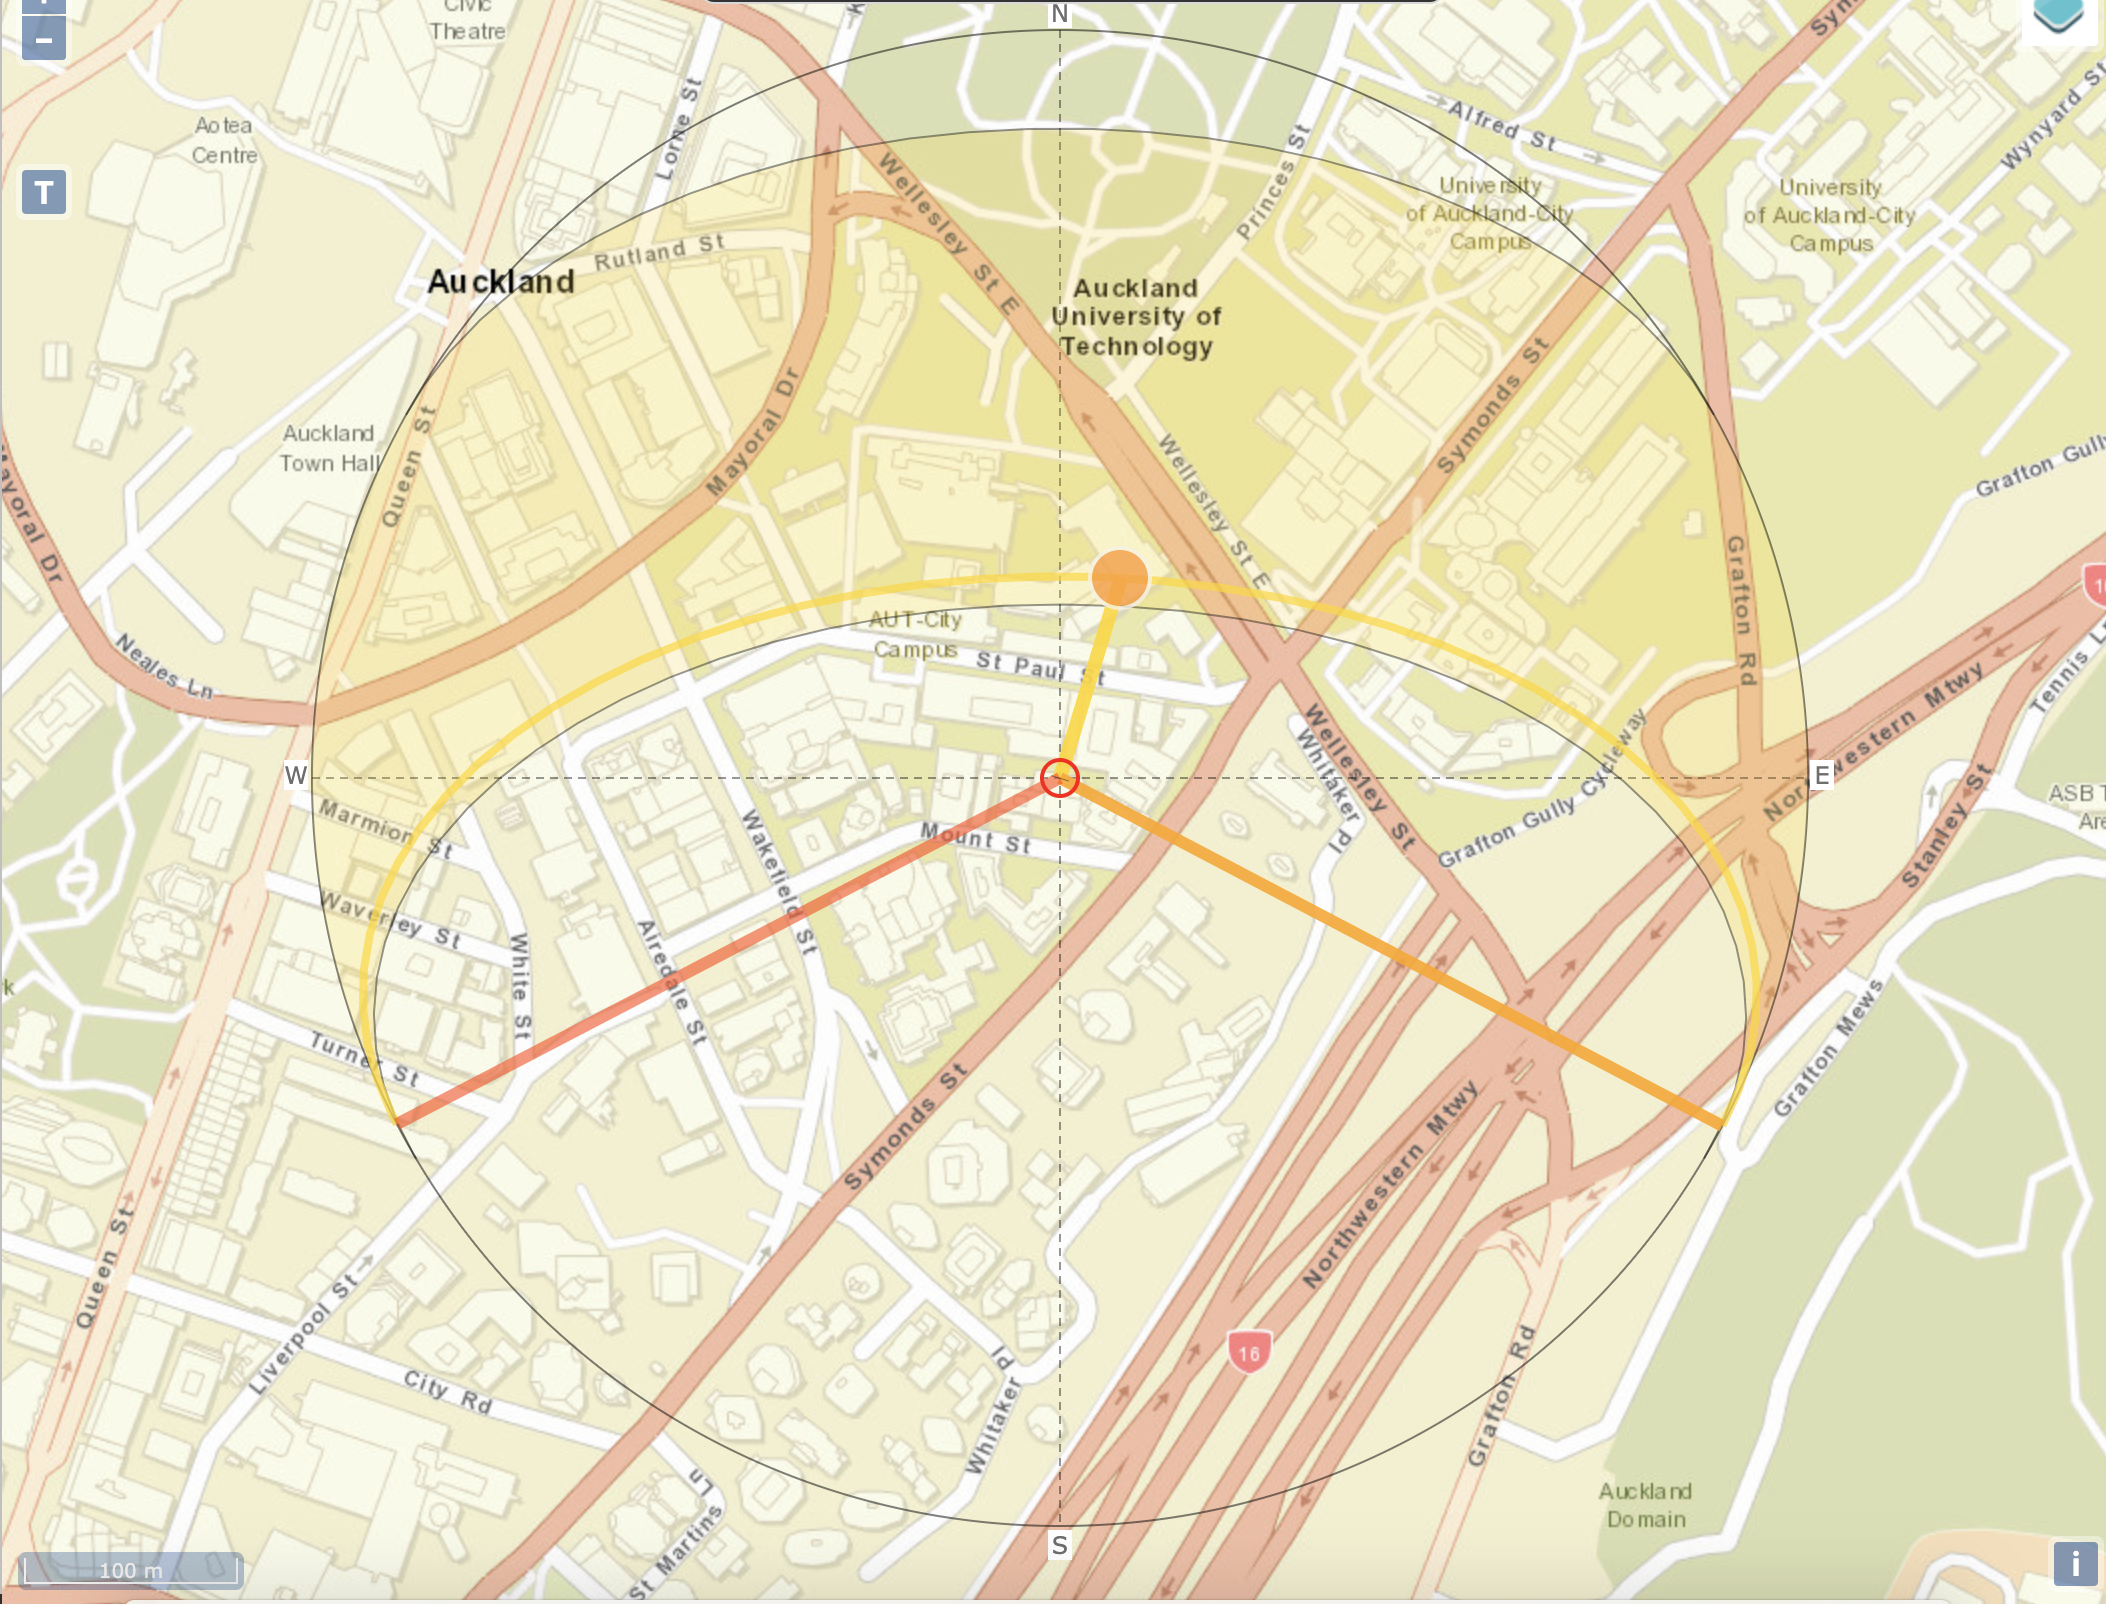
To understand how lighting effects the site it is important to look at the suns activity, both during the summer and during the winter.
This image above shows the movement and positioning of the sun mid summer on the 15th of Jan 2019. The orange line represents the sunrise and the red line represents the sunset. As in summer there are more hours of day light the two sunrise and sunset lines create a reflex angle. In summer the sun also sits higher in the sky, resulting in better light exposure.
This image above shows the opposite. This is portraying the 15th of Aug 2019. As you can see the angle of sunrise and set is now at an acute angle. In winter the sun sits lower in the sky and there is less hours of daylight.
Being a bathhouse, its most used months would most likely be during winter, when natural light is compromised. In an attempt to use a little artificial light as possible I will investigate several solutions.
One possible solution to this problem could be to include some sort of light diffuser/filtering system into my designs. Below is an example of a similar solution. This is actually in AUT’s new WZ building. In an attempt to let more natural light into the building these mirrors are positioned on varying angles, redirecting the light down throughout the building. I think that this is a very effective solution. I would like to incorporate something of similar nature into my bathhouse design if possible.
look at the light at different times of the day, take 4 photos from the same location throughout the day and examine the conditions.
7:30am (sunrise) 🌅 11am, 3pm 5:30pm. This allows for variety.
Auckland City Council provides a mountain of data through the use of their GIS map website. This is a site where anyone can go to find information on the land and its surrounding context. This becomes particularly useful for the likes of architects, designers and urban planners, who need detailed information about the sites they work with.
In regards to our 9 Mount Street site location it is necessary for us to do detailed research on the surrounding context of the site to better inform our design decisions. I decided to focus on the following; Aerial photography (1950-2017) Underlying features, Hydrology, Land cover and Tangata Whenua.
Aerial Photography
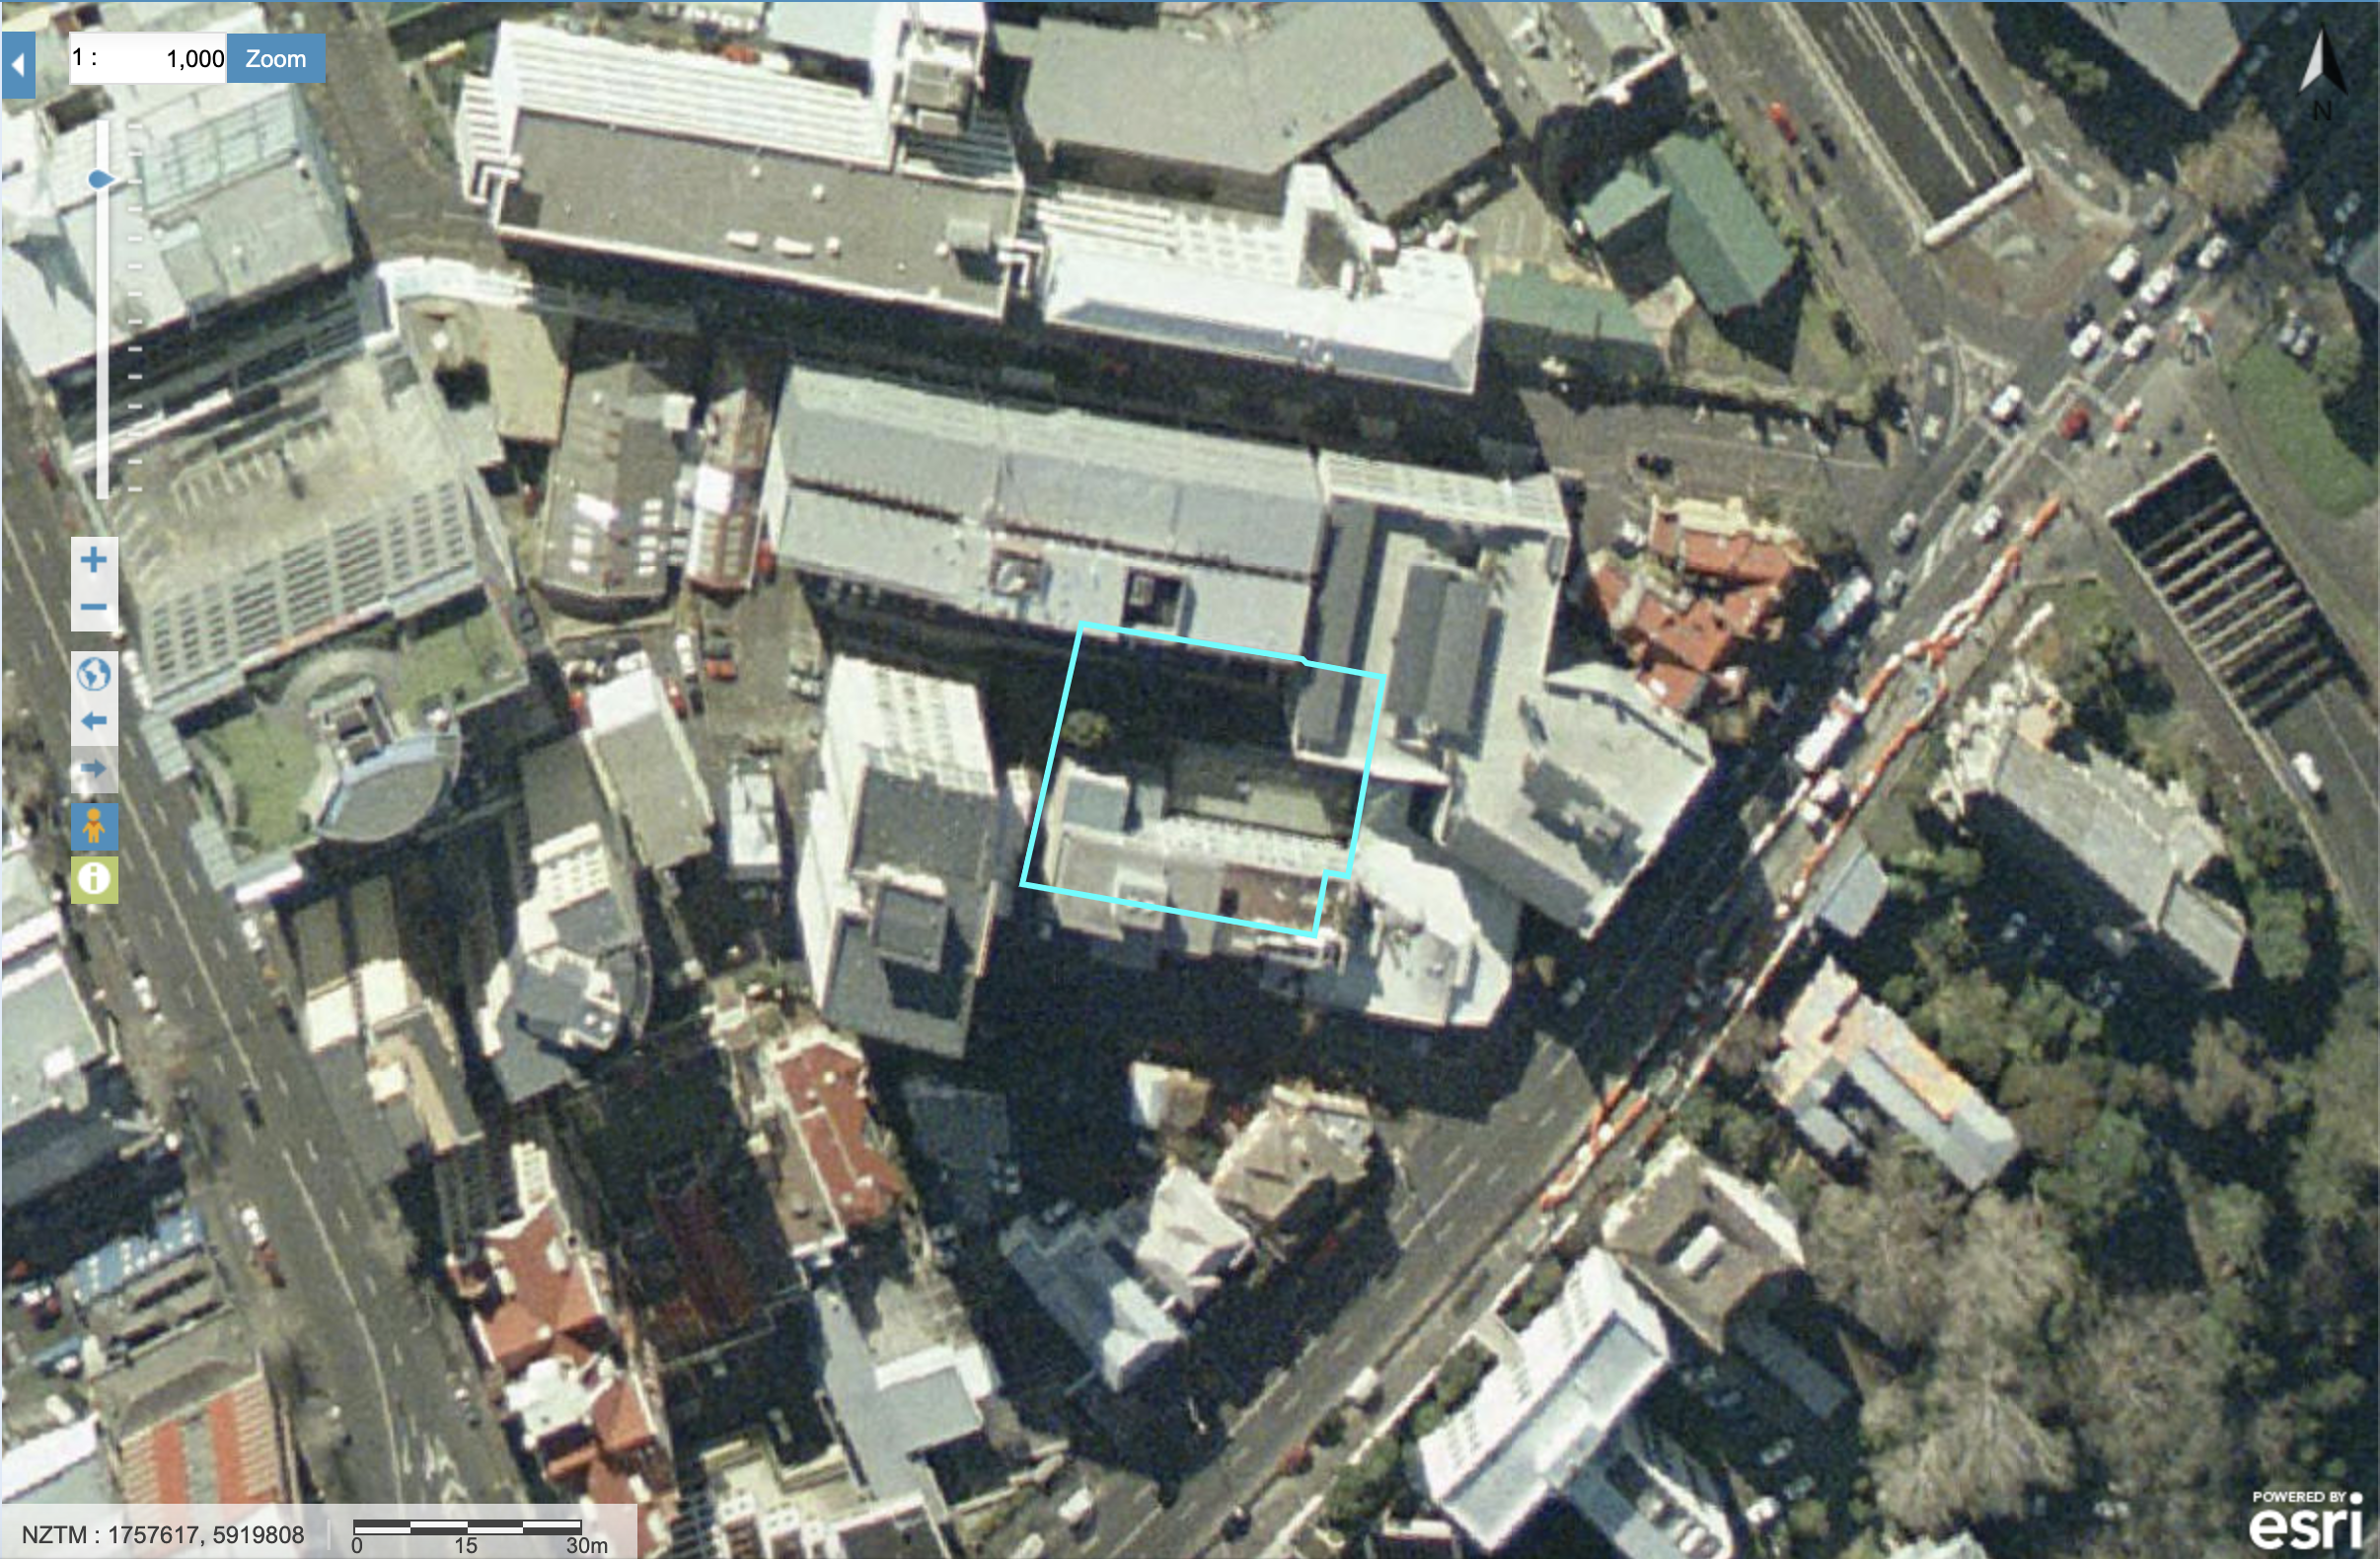
This collection of aerial photography below provide us with the knowledge of both the past uses of the site and the rate at which this area developed. This will help to gain context on the history of the area and the surrounding environment.
1940 – The general layout of the street still exists in this aerial, however looks to much much more residential focused.2001 – This is the first year that some form of the Daddley building comes into view, This building was most likely built before this but the aerial photography has not been kept up to date. 2006 – In this year several new surrounding buildings come into view, with one of them being WSA, AUT’s student apartments and Forte apartments which is surprisingly close to our sites boundaries.2017 is the most up to date aerial photo that the GIS map database has of this location. As you can see the current WZ building is still under construction.
Underlying Features – Hydrology
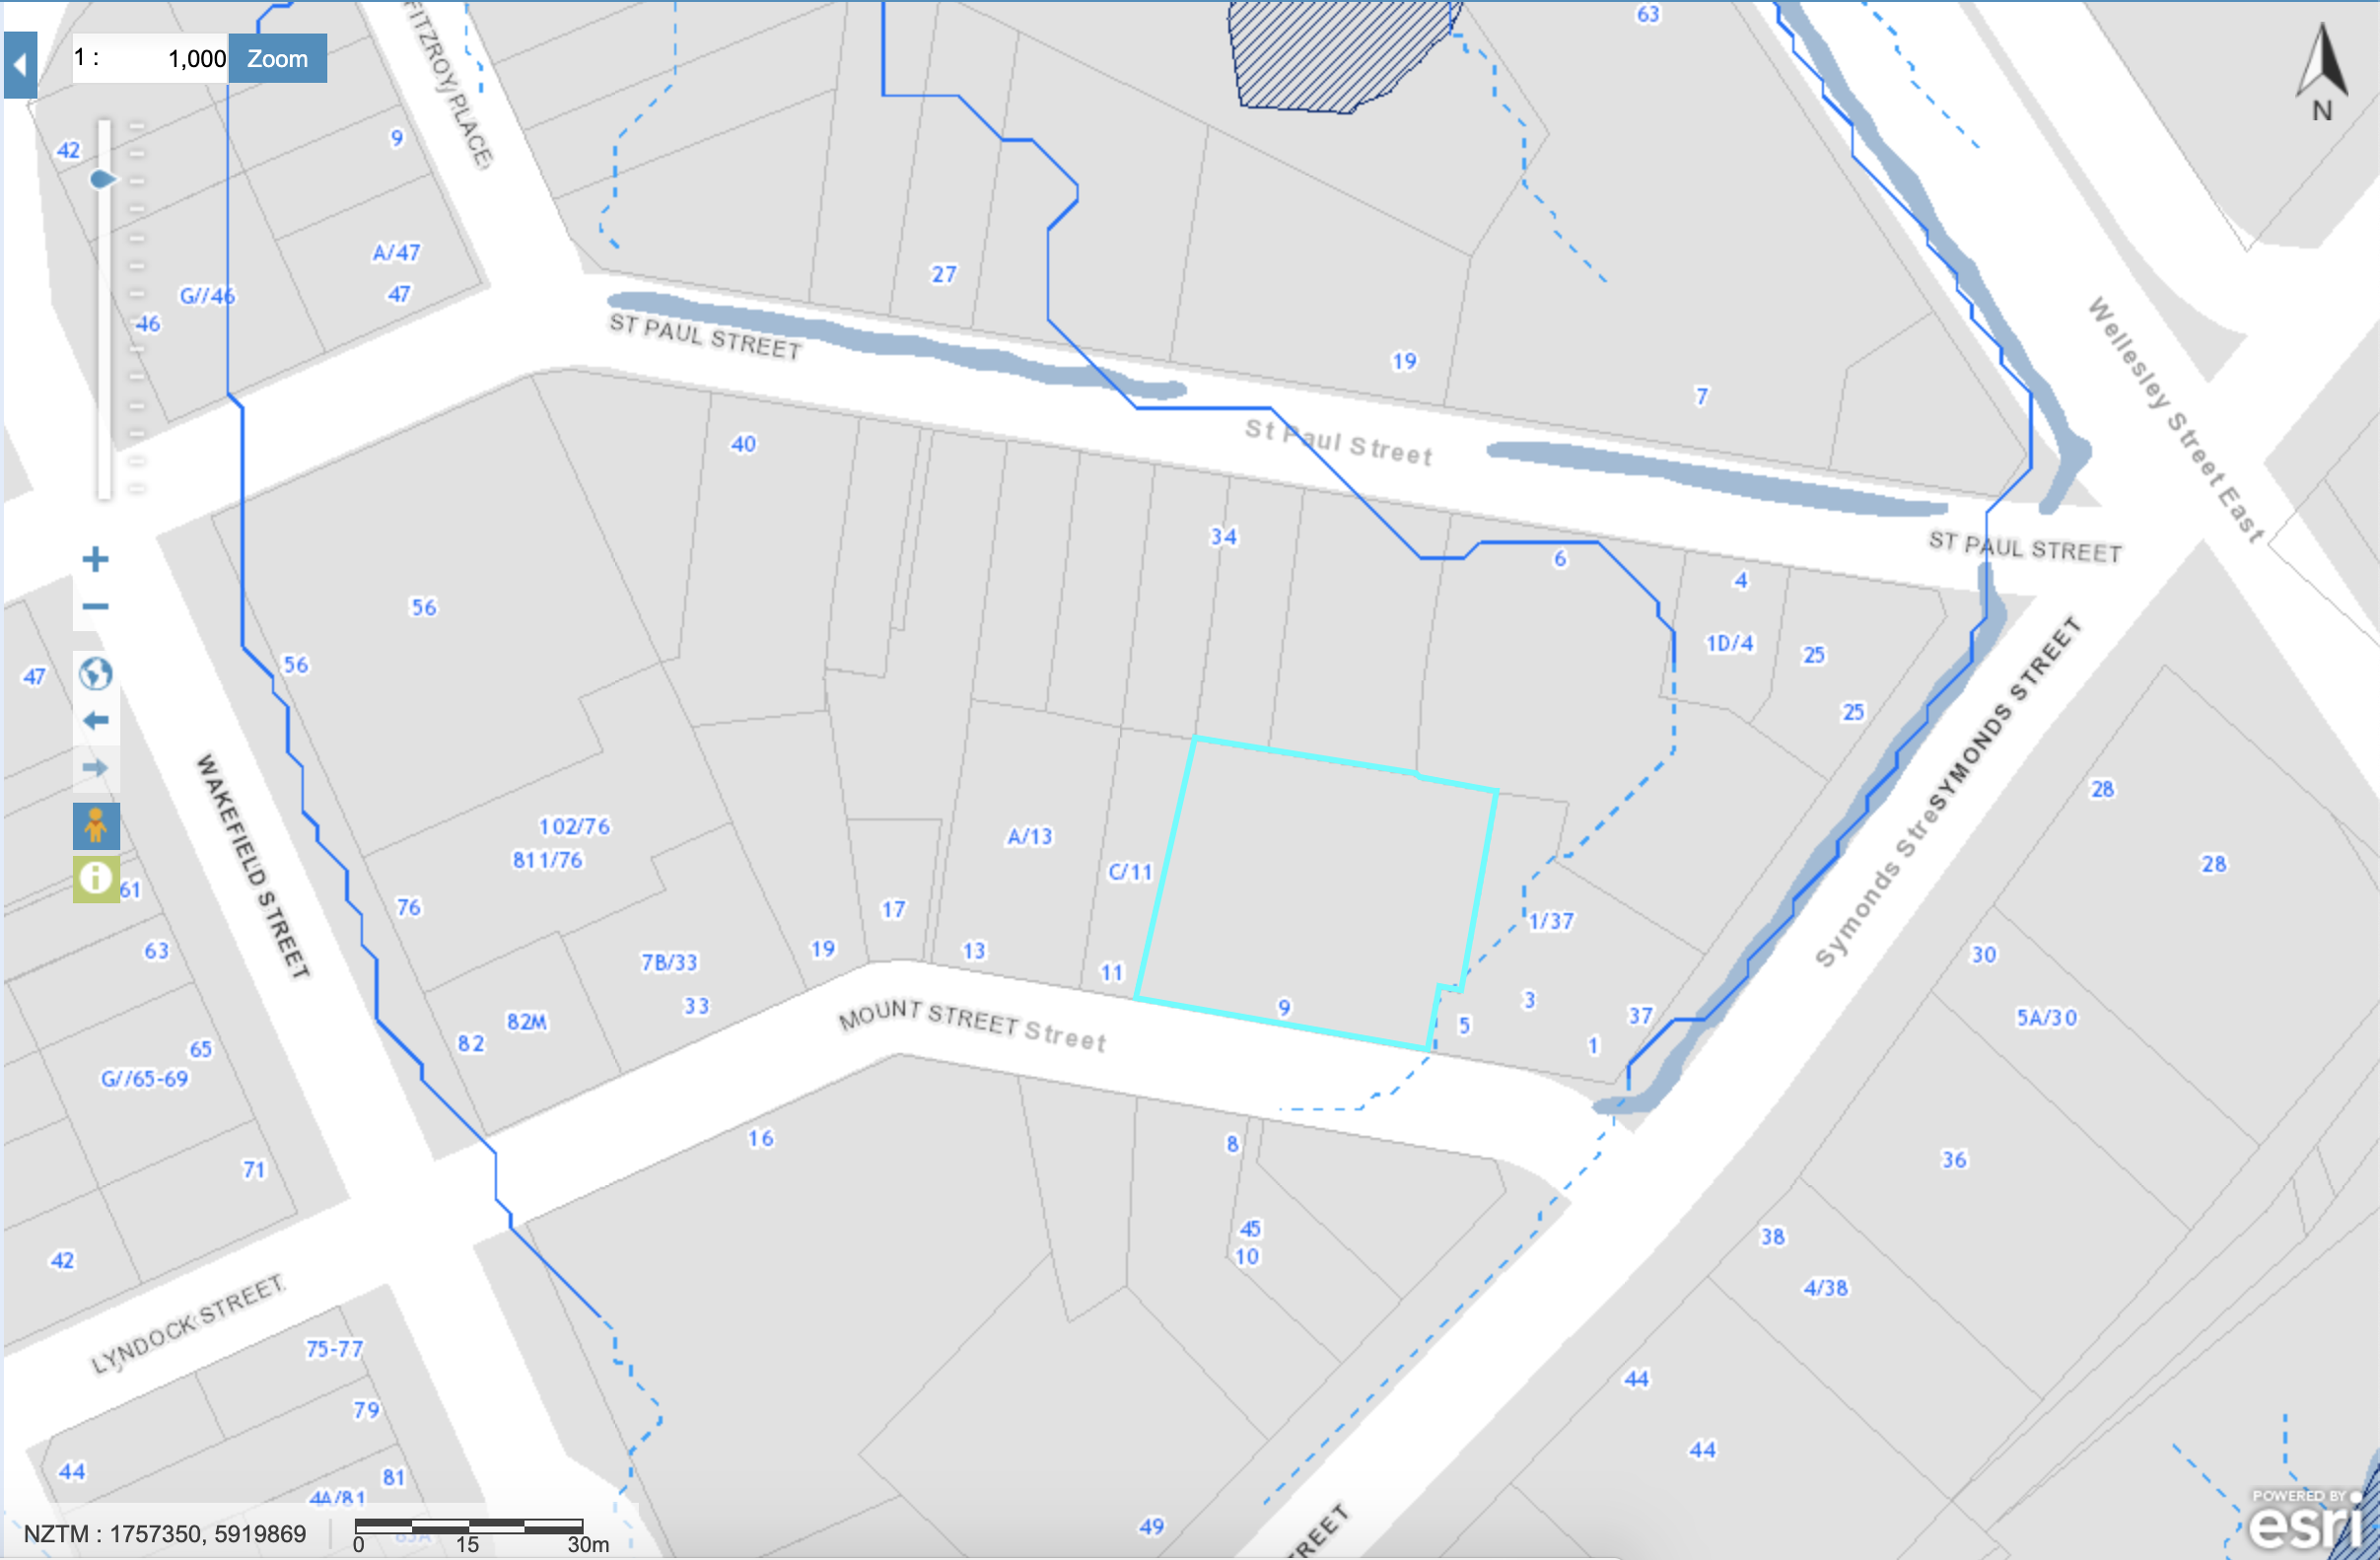
GIS also allows you to see all of the underlying features of a site. In this screenshot below I have studied the Hydrology of the site and it’s wider context.
There are a couple of different things being shown here. The dark blue lines represent overland flow paths and the light blue patches seen along St Paul Street and Symonds Street represent flood plains.
From examining this overlay there seems to be some sort of water flow just on the boarder of our site outline. This is . represented b y the light blue dotted line. Referring back to the GIS key, it states that this light blue dotted line represents (overland flow paths of 2000m2 to 4000m2) This is the lowest volume of water flow shown on the map, meaning that it is most likely not a big problem but still something to be considered.
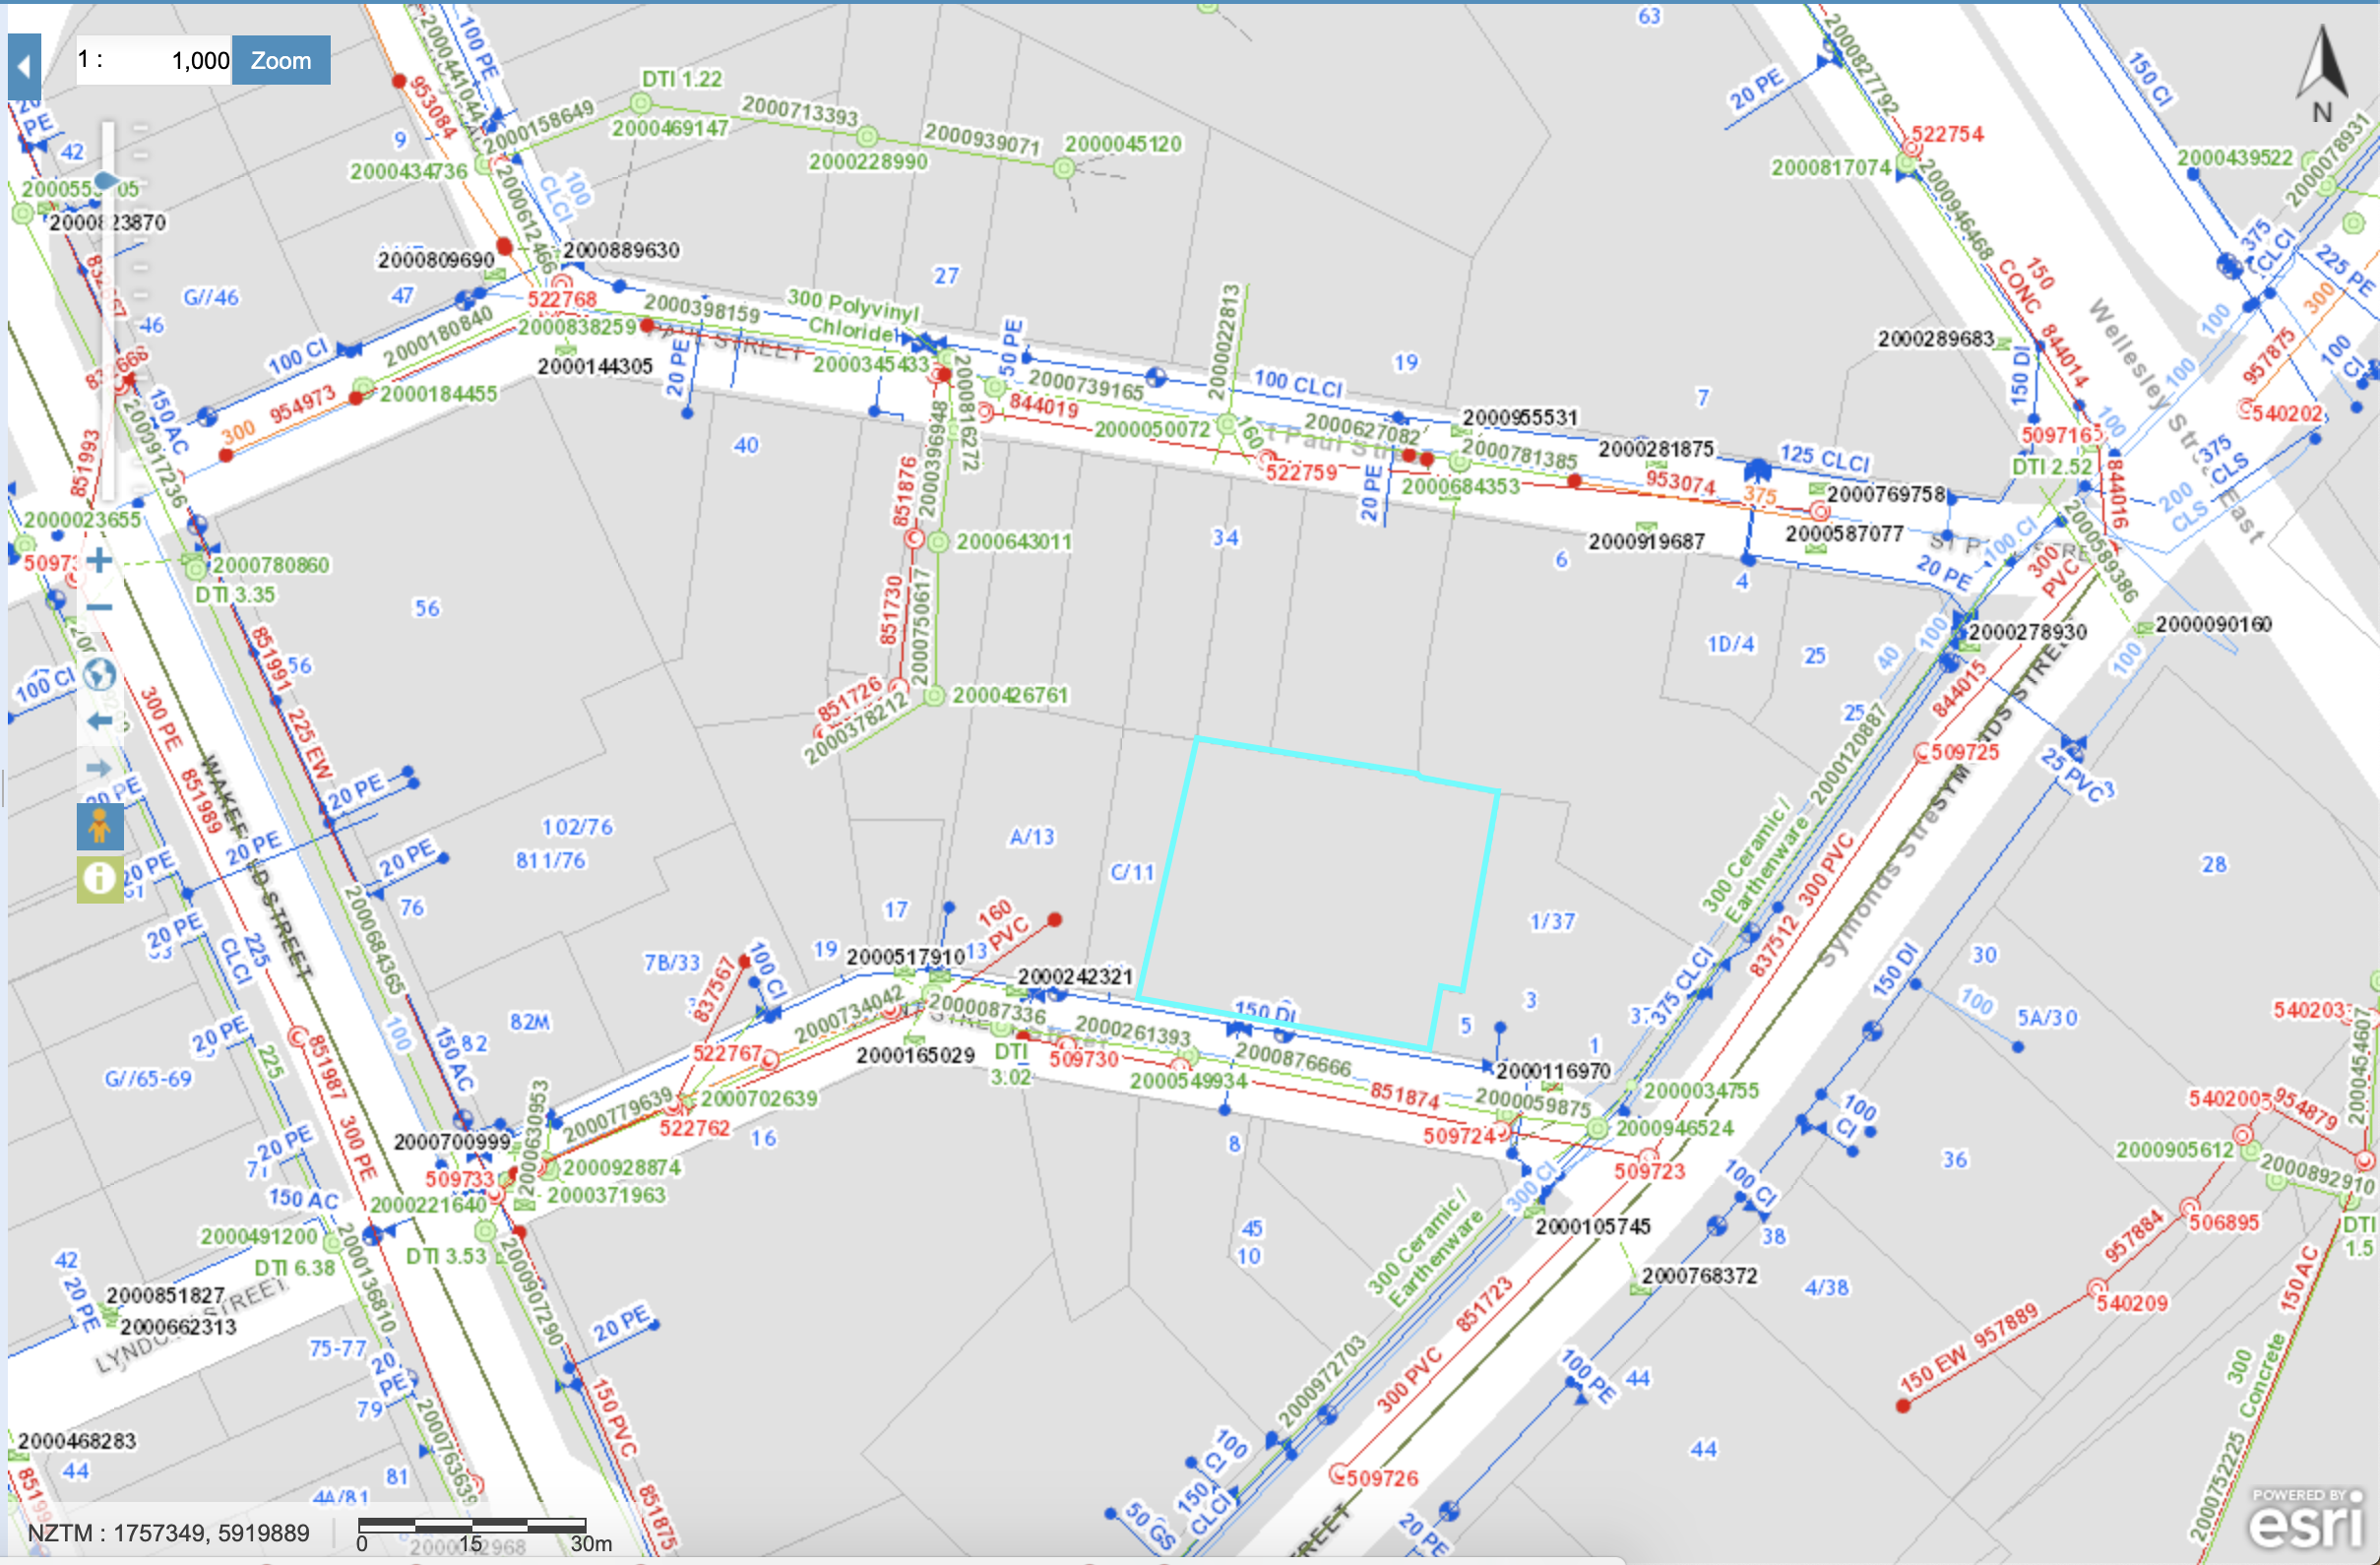
This GIS overlay allows us to see all the underlying pipelines of the site and surrounding context.
Wastewater pipes are shown in RED
Stormwater pipes in Green
Standard water in Blue
Upon further inspection, there doesn’t seem to be any underlying waste water pipes within the sites boundaries. I am assuming that this would be a problem and that an existing waste water pipe would need to be extended in order to meet the bathhouse waste requirements.
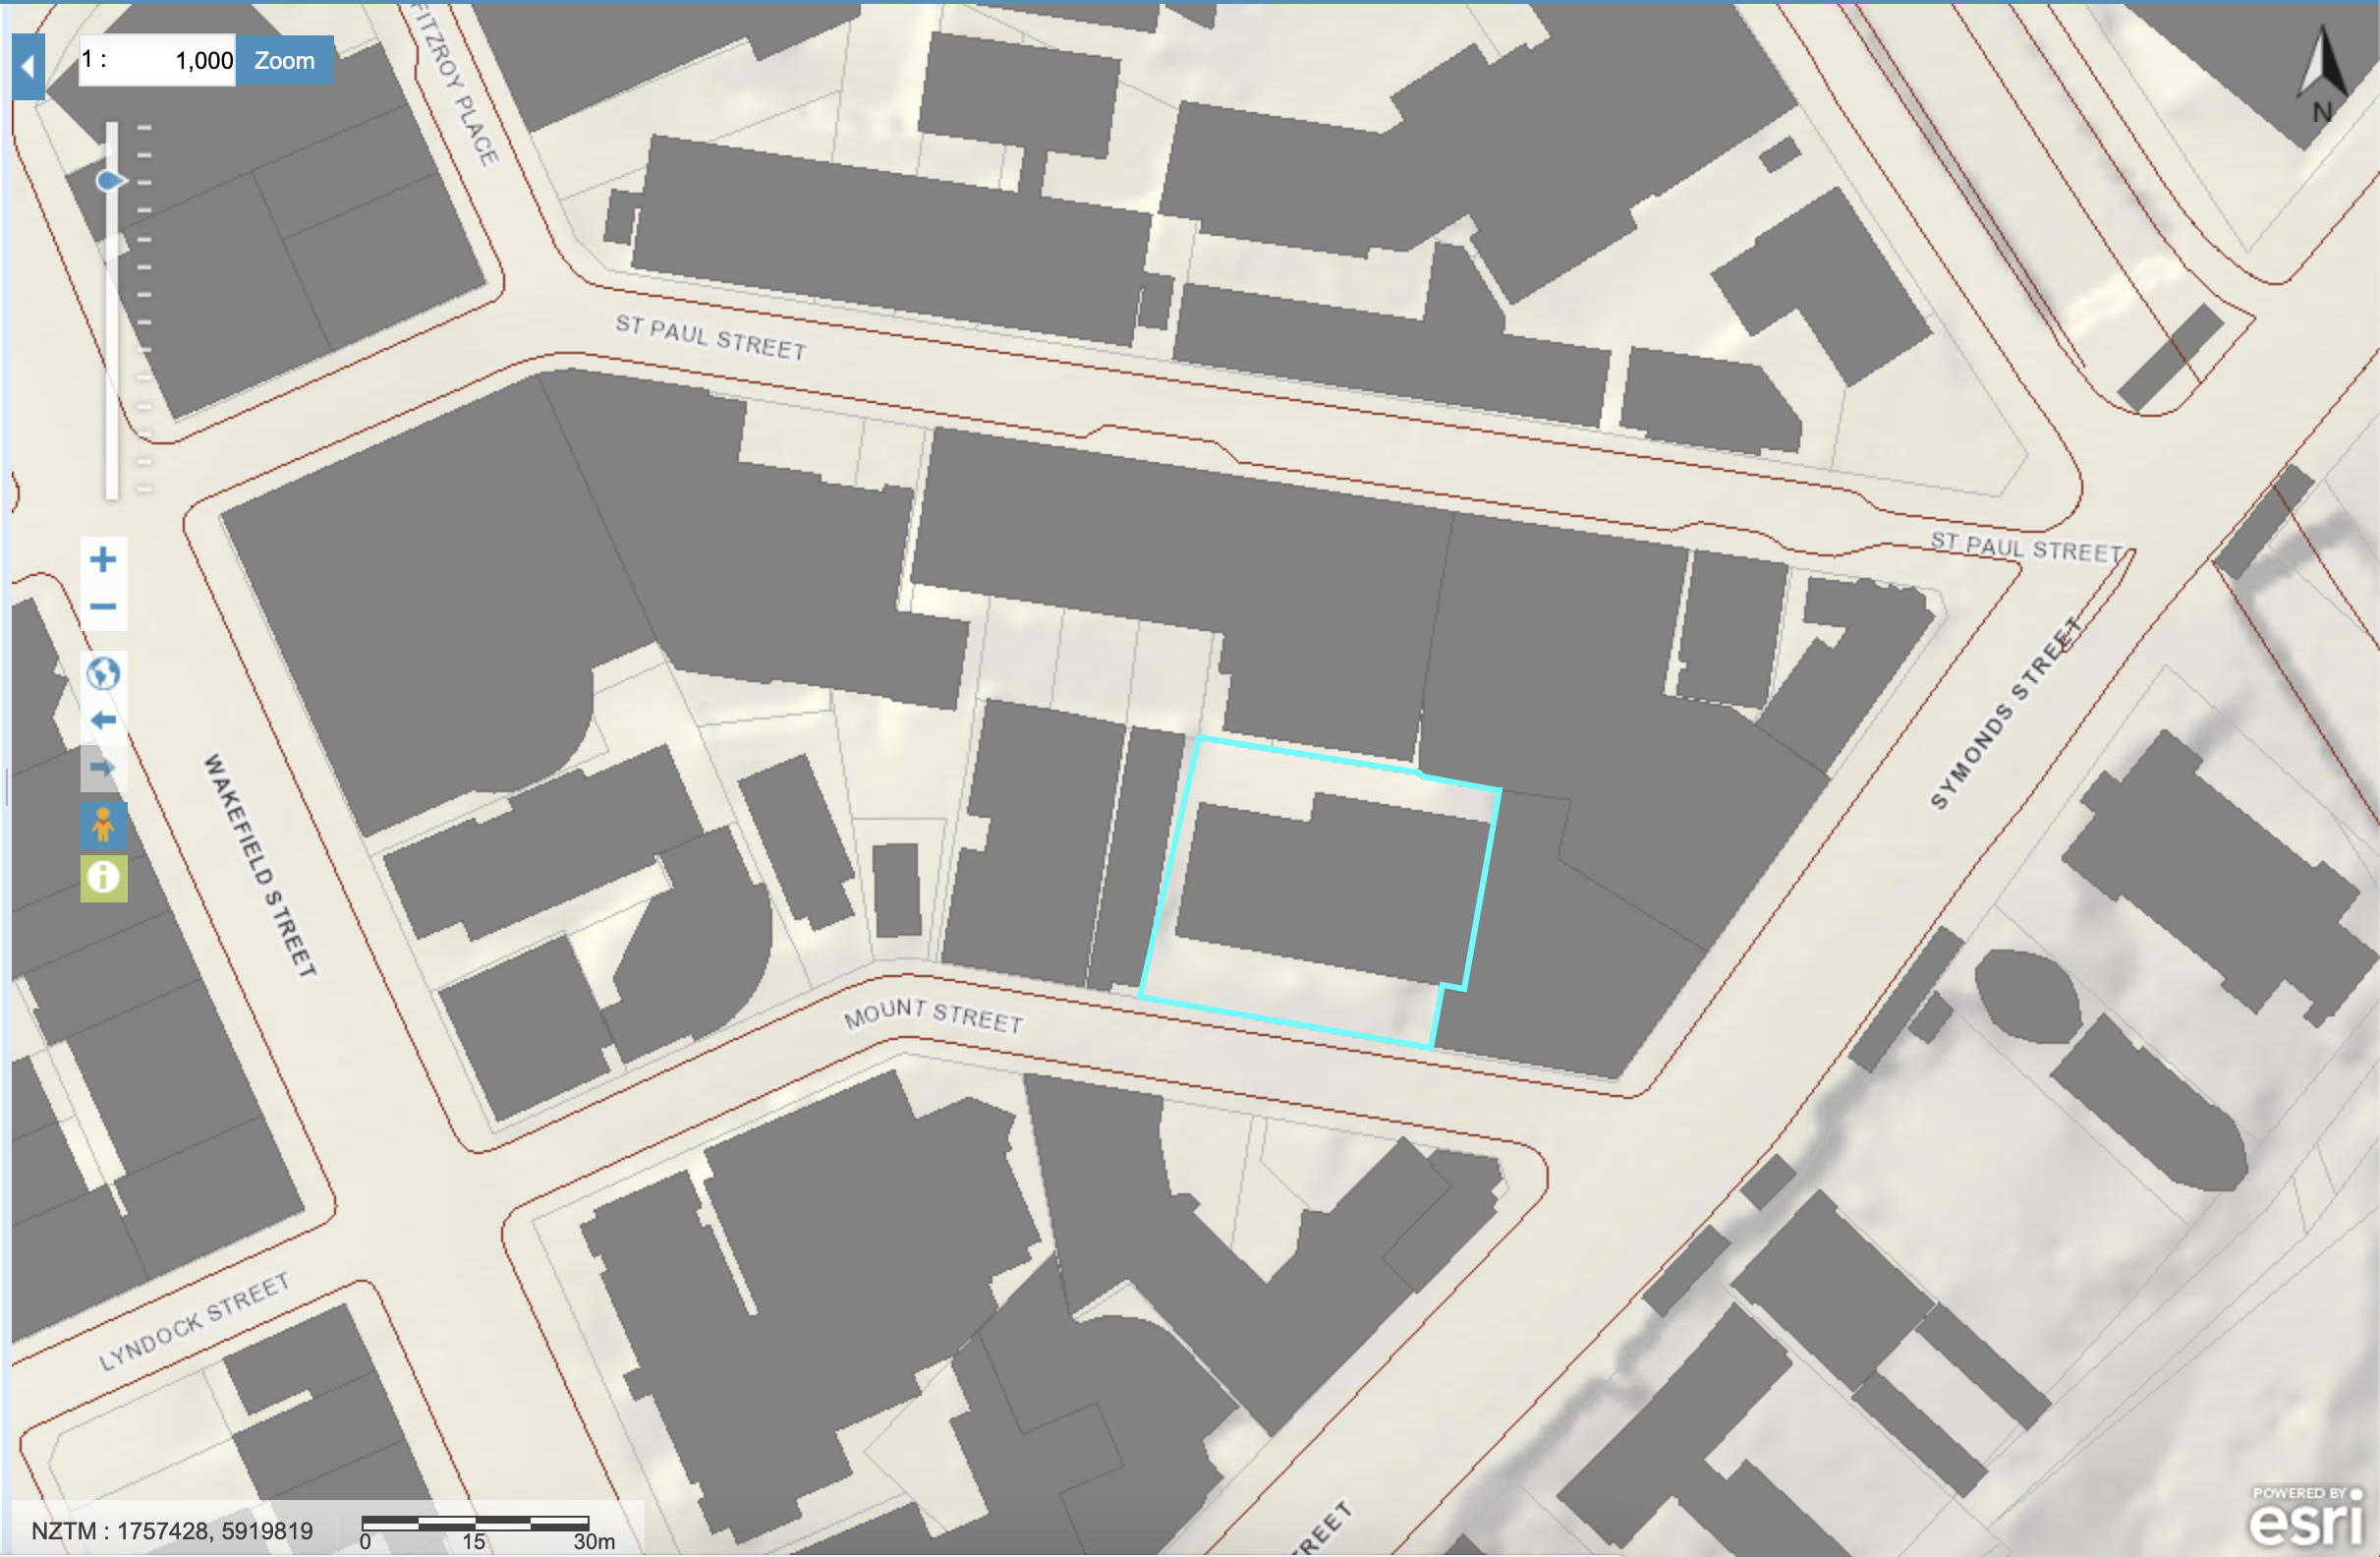
Land Cover
This GIS map overlay allows us to see the current land coverage of the site and surrounding environment. The grey represents current building outlines. This image emphasises how compact the site is, with surrounding buildings right up on the boundary lines. This also helps me to realise the importance of light in regards to my design as natural light is limited.
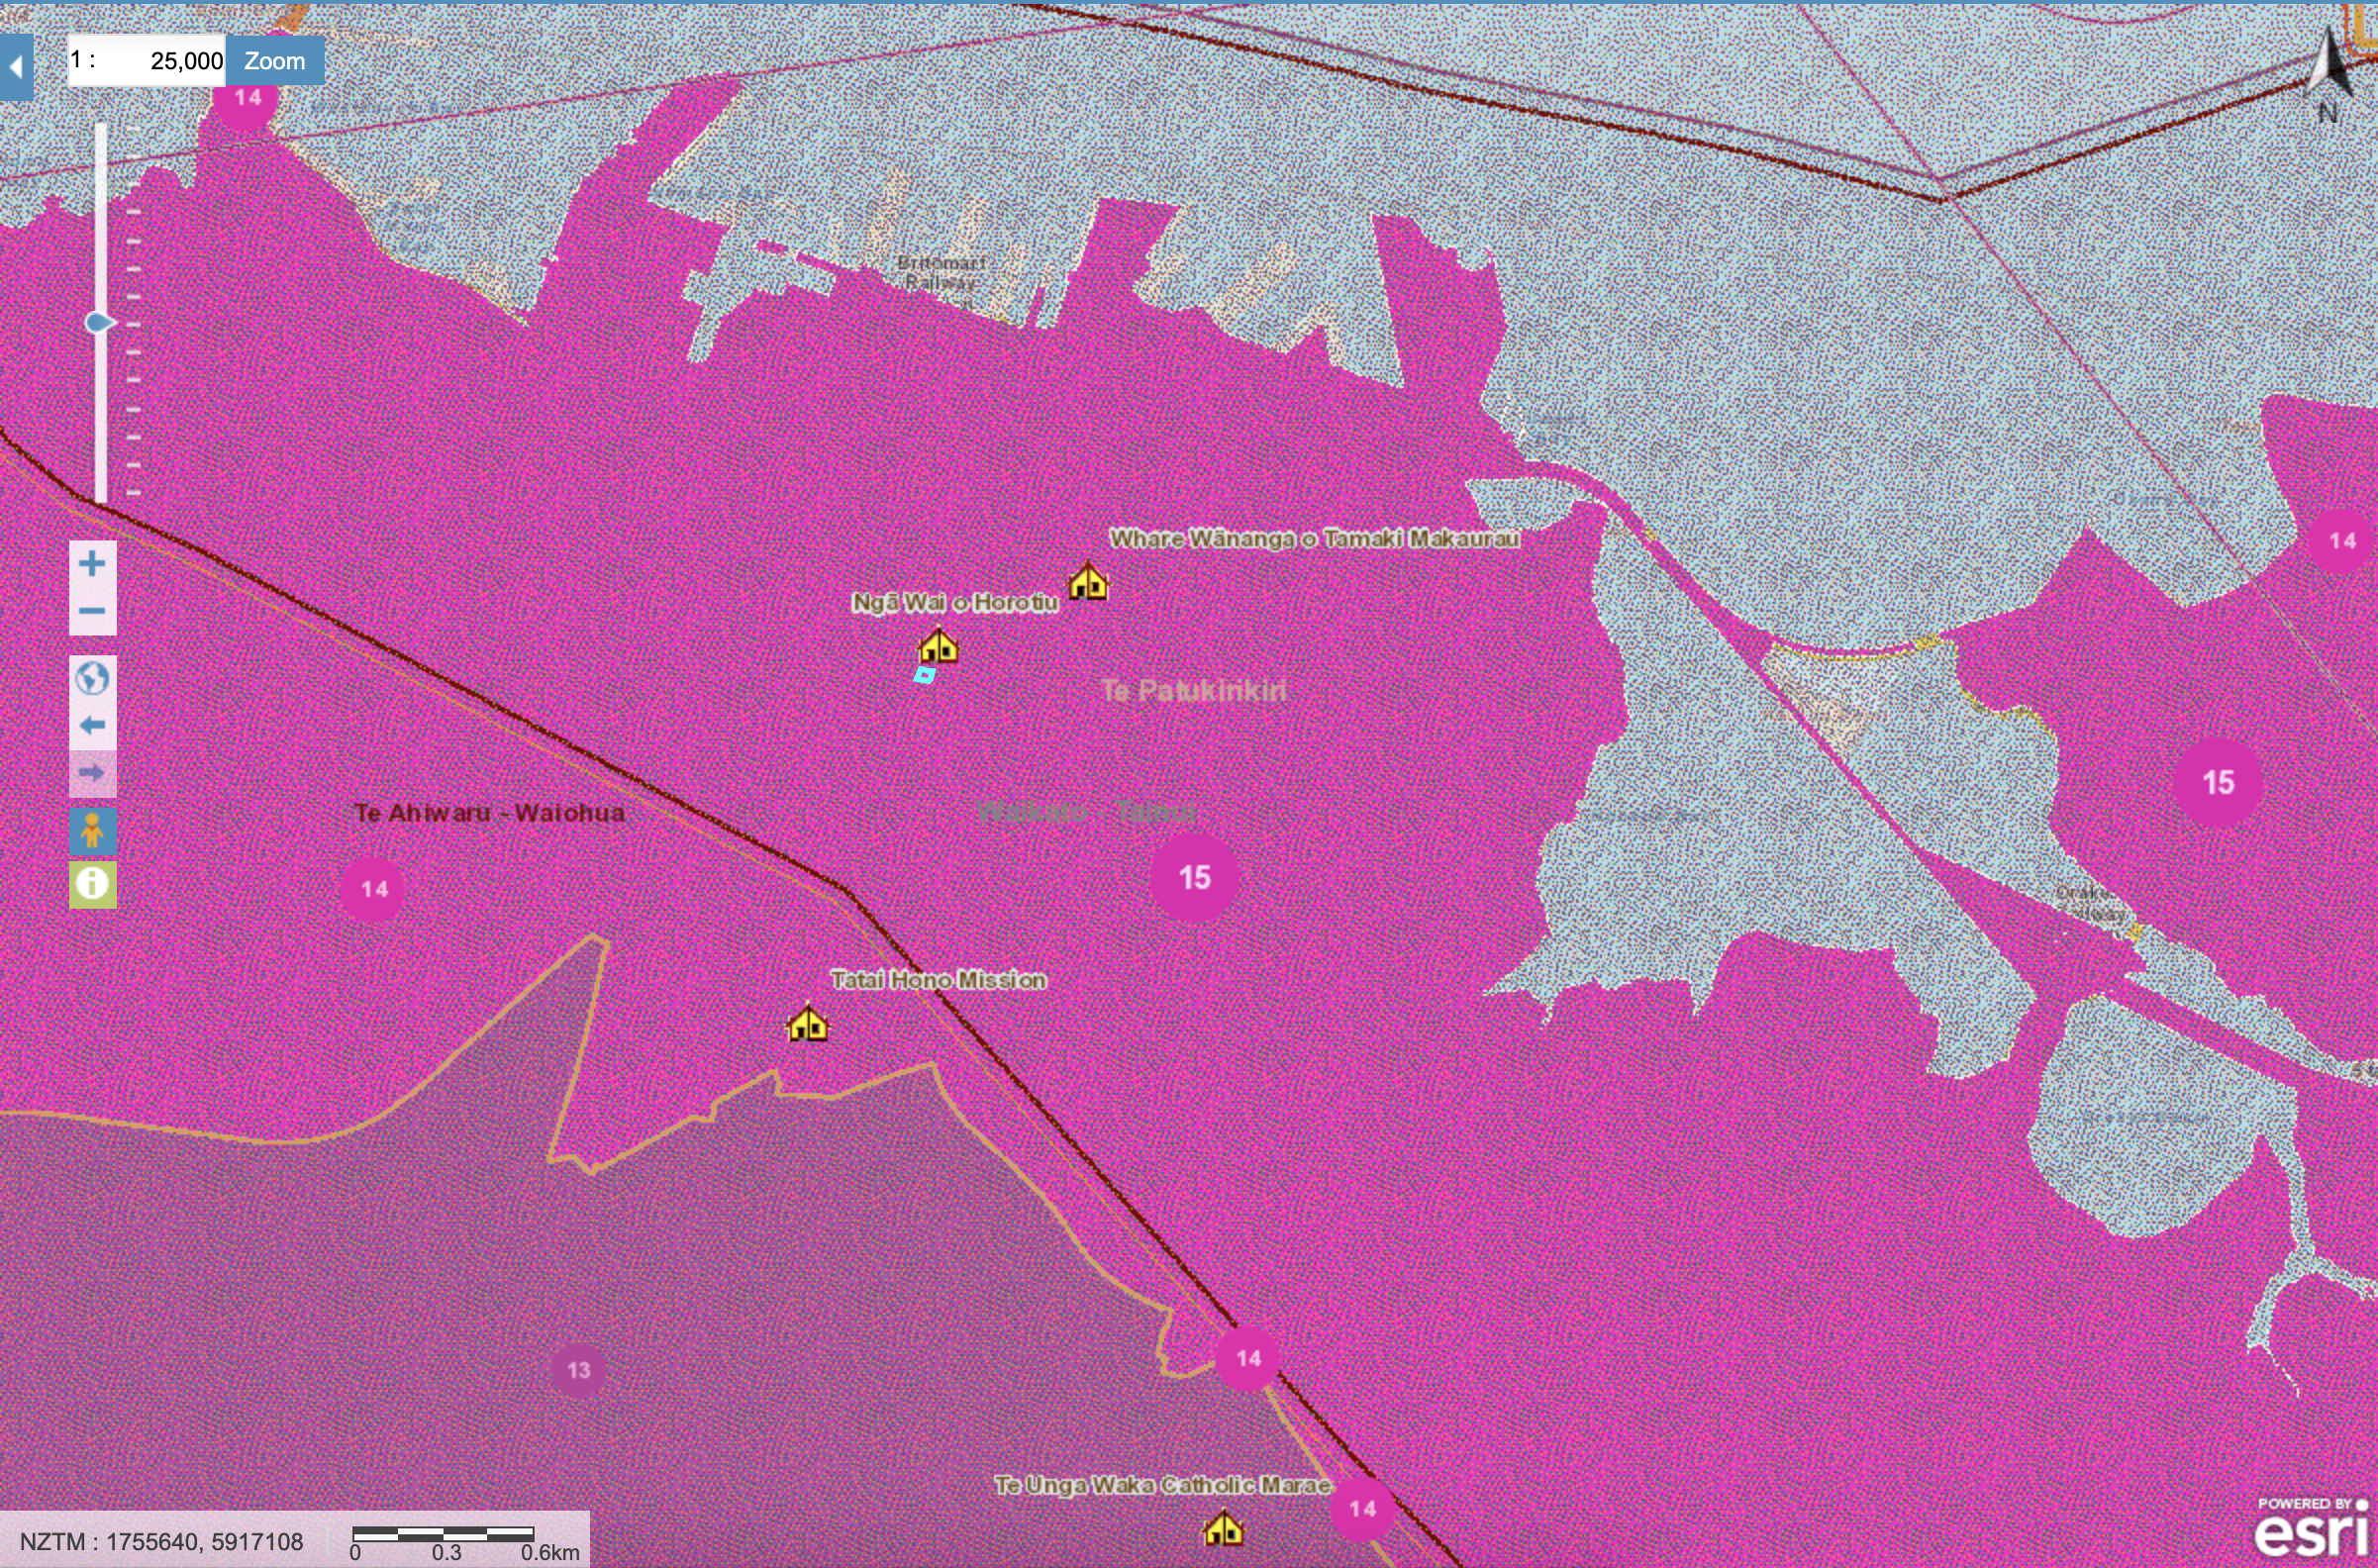
Tangata Whenua
This GIS map overlay outlines the Mana Whenua areas of interest. It allows one to see what Iwi’s are associated, affiliated and connected to the site and its greater environment. In many cases there is more than one Iwi associated to a particular area with many overlaps.
In regards to our site, the associated Iwi is Te Patukirkiri
There are also two Maraes in the vicinity, AUT’s Ngā Wai o Horotui and UOA’s Whare Wānanga o Tamaki Makaurau
This is important information especially when is comes to taking into consideration the Te Aranga Design Principles. It would be necessary to contact the local Iwi in regards to what cultural aspects of the site and environment should be protected and uplifted. It is the Iwi’s best interest to conserve and add to their spatial environments through the use of good design. This is especially prevalent in design of public spaces.
Using the same diagram that we did together for our last site model, we put it into rhino in order to trace over the contours accurately. To make sure the scale of the picture plane in rhino is correct, we took a measurement of one wall and converted it into 1:100 and scaled it up or down based on this measurement.
This meant that what I was doing in rhino was actual size 1:100.
This is how it turned out, we are yet to glue it all together.
When I think of a blissful bathing experience that I have had, many things come to mind, however there are 2 that seem to stand out and interestingly they are both from very different periods in my life.
My first notable experience would have been back when I was around 5 or 6 year old. I remember taking swimming lessons at the local aquatic centre, just down the road from our house. On the first day, we all jumped in the kids pool and our instructor told us to do a “starfish”. laying on my back looking up towards the sky i felt something, a sense of weightlessness. At the time it was a sensation that I had never experienced before. laying there i could see the sunlight pouring through the skylight in the roof high above, the water lapping on my body and all of the other kids around be floating away. When you ears reach the water and fully submerge, sound seems to all merge into one, it becomes dampened and much more soft. It feels as if you have been transported into another world. A truely tranquil experience, that is underrated by most.
The only thing that I disliked about this particular experience was the potent oder of chlorine. This strong chemical smell seemed out of place in the moment and reminded you of where you were, it brought you back to reality.
From this experience I have discovered and learnt sever things. Light is an very important aspect of bathing. Natural light especially, creates an welcoming atmosphere that is perfect for a bathhouse where the aim is to create a space for relaxation. The potency of the chloride has made me more aware to the issue of water filtration and sanitation methods. I plan to do further research into alternative measures that could be both beneficial for ourselves and the greater environment.
In order to accurately model the contours of the site we had to outline where they were and how they were connected to one another. We decided to print out several sheets of the plan and cut each layer based on the contours.
The photos shown above are how it turned out. We decided to use corrugated card board to construct the model, so in do this we collected some boxes from one of our group members work and used them. This however turned out quite difficult as no two panels of cardboard were the same, meaning that some piece of the model turned out better than others.
Upon reflection we, together as an group decided that it would be best to start again and revisit how we would go about making this site model.
The next day in class we collectively decided that we should attempt to make a lasercut version. This would allow for much more accuracy.
Due to environmental concerns and sustainability issues materially and selection of materials play a large role in not only the proposed bathhouse design but the models used to portray it in the design process. In light of these issues our group has decided to limited ourselves to:
3mm thick 100% recycled mount board with no dye
recycled cardboard boxes
We are also going to be staying away from unnatural materials such as foam board and plastic which have a very negative impact on our surrounding environment.
Material selection also relates back to the Te Aranga Design Principal of Kitiakitanga – This involves managing and conserving the environment as part of a reciprocal relationship, based on the Maroi world view that we as humans are part of the natural world. I will make sure to abide by this principle when is comes to selecting the materials for our bathhouse proposal.
This will likely result in sourcing materials from local parties rather than sourcing materials from overseas as this would have a greater negative impact.
Today we were introduced to the Te Aranga Design Principals. They are a set of outcome-based principles founded on Māori cultural values and formulated to provide practical guidance for enhancing outcomes for the design environment.
Rangatiratanga: The right to exercise authority and self determination within ones own iwi / hapū realm
Kaitiakitanga: managing and conserving the environment as part of a reciprocal relationship, based on the Māori world view that we as humans are part of the natural world.
Mauritanga: maintaining the life force to ensure the Environment is protected, maintained or revitalised Environmental health is protected, maintained and / or
Manaakitanga: the ethic of holistic hospitality whereby mana whenua have inherited obligations to be the best hosts they can be
Wairuatanga: the immutable spiritual connection between people and their environments
When submitting planning permission to the Auckland city council design principles need to be taken into account and have to be up-to a certain standard, this is especially so the case when it comes to public submissions.
We have been tasked with ensuing that we adhere and take note of these design guidelines and apply their thinking, values and beliefs to proposed intervention.
The Tepid Baths are located in Aucklands CBD close to the water front. The building was built in 1914. Recently the building has undergone huge refurbishments and is now a public pool. The only indoor public pool in the city.
2019
Today I decided to take a walk down to have a look. Now surrounded by motorway over bridges and high rise buildings it could have easily been lost over the years, the decision to make it a heritage building was a good one.
In 2008 a conservation plan was written in order to make sure it keeps its heritage elements intact and that it not dwarfed or obstructed by new developments in the area.
Inside, in the reception area there is a mini exhibition area showing the history of the baths. there were photos and old remnants of the baths before it was re developed. This included some of the original tiles.
Over the years there have been a substantial number of modifications to the Tepid Baths. Nevertheless, the building retains much of its original qualities both in terms of function and form.
It is interesting to see such an early example of a bathhouse in New Zealand. The social aspect of these baths was interesting at the time also with there being separate pools for men and woman. This segregation also implied different uses as the mens pool has gym equipment to work out with while on the other hand the womens pool has baskets of hanging flowers, suggesting that they should bathe in a much more leisurely pace.
Our space that we are designing has to have adequate facilities to cater for the needs of the spa goers, this includes an area to get changed. In most modern day pools and gyms we see segregated men and woman changing rooms. Today during my visit I noticed that surrounding the pool there were a series of individual unisex changing pods, somewhat similar to the booths they had back in 1914. This seems like a much better use of space, not having to have specific for men and women. This could be of benefit to me as the space in which we have to work in is limited, anything that can be done to save space would be ideal and I will make sure to consider this when designing.
The city of Auckland lays atop a vast volcanic field. All of Auckland’s volcanoes come from one magma source. Underlying Auckland is a diffuse pool of magma that occasionally finds its way to the surface. Unlike a ‘classic’ volcano – such as Mt Taranaki or Mt Ngāuruhoe with a single vent through the crust – in Auckland, the magma finds different routes through the crust and erupts in a different place each time.
To help grasp a better understanding on the shear scale and number of volcanos I have added this map above. As you can see is swamped full of both active and dormant volcanoes.
With volcanoes comes difficult terrain, as majority of of Auckland’s volcanos represent a cone shape. Having so many clustered together in one place makes for an interesting landscape. One that is undulating in nature making it hard to build on.
There are also many protected areas in regards to Auckland’s volcanoes. For example Mt Eden, Mt Albert and Mt Wellington are all protected with no cars being allowed up. I have become public parks for people to enjoy with most of them having a summit walks.
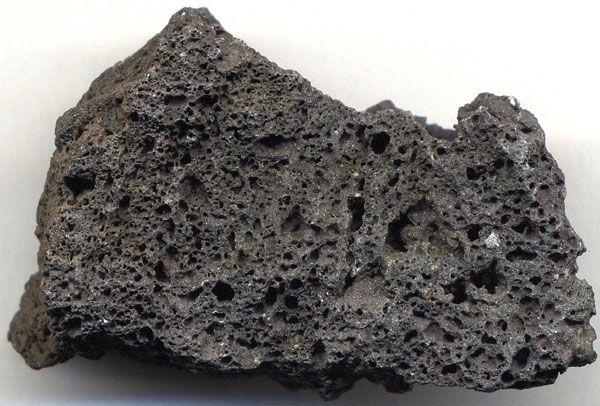
The Dadley building features volcanic rock facades made from locally sourced Igneous rock. Igneous rock is a very porous rock and is formed through the cooling and solidification of magma or lava.
It would be interesting to see if I could incorporate this material into my own design. I am not too sure if I like it in its raw form, but it could be interesting to see of it could be cut into tiles possibly. I plan to take note and make use of locally sauced materials during my design process.